Showing posts with label Making gifts series. Show all posts

Friday, December 14, 2012

Supporting Artists Guest blog post

I am so excited today is my first post as a guest blogger!

I have been asked to contribute a regular column on the Supporting Artist Blog.  This month I shared some great holiday recipes you can make with herbs for yourself or as gifts.

Hop on over to the Supporting Artist Blog and check out my post!
Here is the direct link to the blog post!
http://www.supporting-artists.com/happy-holiday-herbs

Monday, October 22, 2012

Celebrate NUT DAY! Walnut Rosemary Brittle

I know there have been several nut recipes this week, but it is due to the fact that today is National NUT Day, not crazy like me, but nuts, like walnut, pecans, etc.  so in celebration, here is another recipe for a nut treat!  This is a rich herbal flavored spin on a traditional item. 

These days I make less and less Peanut Brittle because those around me have allergies, but I find that walnuts seem to cause less sensitivity so now I make this Walnut Brittle instead.
The technique for brittle is the same as a traditional recipe.  You heat the sugar and water to a boil and let it boil until the sugar caramelizes to a perfect amber color.  I use those silicone baking sheets now rather than a buttered pan because the flexibility of the mat makes breaking and removing so much easier and less messy.

Walnut Rosemary Brittle
I use dried herbs for this, but for a more earthy flavor you can use fresh rosemary.  Add the fresh rosemary at the very last moment so it does not loose its green color.
1 cup sugar
1/3 cup water
Pinch of cream of tartar
1 cup walnut halves
3/4 Tbls. dried rosemary
In a medium pot, combine sugar, water and cream of tartar.  Stir over medium heat until sugar is dissolved.  Cover the pot and let boil approximately 5 minutes undisturbed.  Remove lid and examine color of the molten sugar.  When the mixture turns amber, quickly add the walnuts and rosemary, gently stirring to incorporate.  Pour brittle onto silicone mat or onto a buttered baking sheet.  Spread thin with a buttered spatula to achieve a glass like texture. 
For a special treat sprinkle sea salt crystals while candy is still warm for a sweet salty treat.

Also check out the Spicy Pecans we posted for the weekend recipe, Oct. 19, 2012

Monday, October 8, 2012

Gifts for Dogs - Holiday Preparation

I decided that I needed to get a jump on my holiday planning as my teaching schedule has doubled this year leaving me much less free time.  As a result you get to reap the benefits.  Starting this week I will share a holiday recipe, gift idea, craft project,  or other relevant holiday themed idea at least once a week.  This will be in addition to the annual Advent Calendar which is chocked full of more recipes and crafty ideas.
Today I am starting with something for your dog.  I like to make dog biscuits and I found this recipe on the internet and fell in love with it.  Unfortunately I lost the citation in a resave accident so if anyone knows who originally posted this I would love to give them credit.

I liked this project because it can be a recipe or a gift to craft a recipe.  You can layer the items in a jar and present it as a gift with instructions or you can make the biscuits yourself and wrap those to be the gift.  It is simple and fun and your kids can help with it.


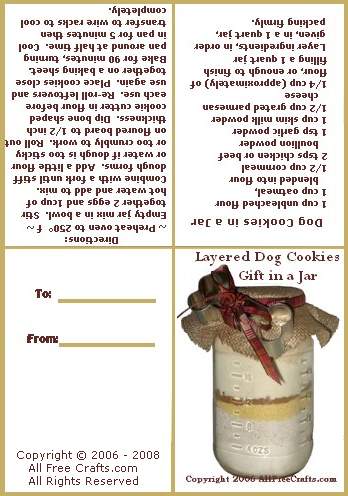
Layered Dog Cookie Jar Mix


Ingredients:
  • 1 cup unbleached or whole wheat flour
  • 1 cup of oatmeal, blended into flour
  • ½ cup cornmeal
  • 2 tsps beef or chicken bouillon granules
  • 1 tsp garlic powder
  • 1 cup skim milk powder
  • ½ cup grated Parmesan cheese (I used the grated Parmesan that is commercially made to sprinkle on pasta)
  • ¼ cup (approximately) of flour, or enough to fill a one quart jar
Directions:

Preheat oven to 250° Fahrenheit.

Empty jar mix into a bowl. Stir together two eggs and 1 cup of hot water and add to mix. Combine with a fork until a stiff dough forms. Add a little flour or water if dough is too sticky or too dry to work.

Roll out dough on floured board to ½ inch thickness. Dip cookie cutters in flour before cutting out each cookie. A bone shaped cutter is preferred, but any shape will do. Re-roll the leftovers and cut as many cookies as possible.

You can place cookies close together on a baking sheet as they will not spread while baking. Bake for about 90 minutes, or until cookies are dry and hard, turning pan around at half time to ensure even cooking. You can turn off the heat, but leave the cookies in the oven to dry out without further cooking if necessary. Dog cookies are usually baked until they are hard and crunchy. Let cool completely before storing in an airtight jar.

Jar Preparation

Use a funnel to layer ingredients, in the order given, in a one quart jar, packing each layer firmly with the back of a spoon.

Decorate the jar, I used brown muslin, but burlap will work well too.  The fabric is 6 inches in diameter held in place with a ball mason screw top.  You can also put the fabric over the jar lid to cover the band and hold it in place with ribbon, raffia or a rubber band.  Both give you a place to tie on the directions.
You can add a cookie cutter to the jar to make the gift a complete package.
I made a sample label.  You print it out and fold in the center to give you a cover and directions on opposite sides.  I like that you get three to a sheet of paper.

All of these ingredients keep well in a mason jar, so you can make the recipe way ahead and save them for holiday treats.

Happy Crafting!
}, 10);